Terminal Ballistics - Part 1
In this update, we polish the "untitled tank game" from the previous few posts, and give it a proper title: Terminal Ballistics.
To move the development along, several new features are added here which I have been planning to attempt ever since my first 3D game.
Note:
This post expands on the work from two previous posts: [Part 1, Part 2]
Demo:
The demo is available on Itch.io as Terminal Ballistics
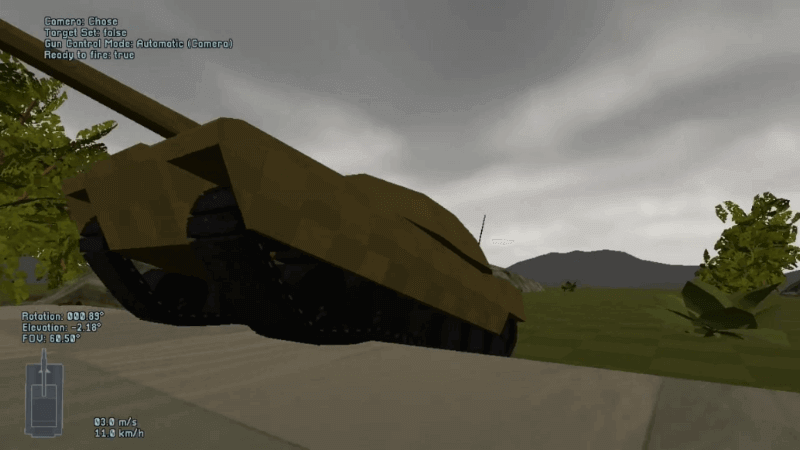
Adding Ray-Cast Suspension
Ray-cast suspension is the technique of casting multiple rays down from the vehicle where wheels (or in this case, tracks) would be, and using the distance to the ground to compute a suspension force pushing back up on the vehicle. The rays can also be the locations from which propulsion and traction forces are applied.
Adding a ray-cast method of suspension and propulsion was a goal from my previous Godot 3.5 vehicle project that I was previously unable to tackle. My old Godot 3.5 project took advantage of the built-in VehicleWheel nodes, however they had some quirks (such as constant sliding on slopes) that made me inclined to develop my own in-house version.
I was finally able to crack the code by digesting the work of Tobalation's GDCustomRaycastVehicle project on GitHub.
In general, the technique works by casting RayCast3Ds down from the vehicle, imparting an upward force on the vehicle relative to the "spring" compression, and applying thrust/braking/lateral forces.
The "high-resolution" casting used for the player's vehicle is comprised of 16 rays, spread along the two tracks.

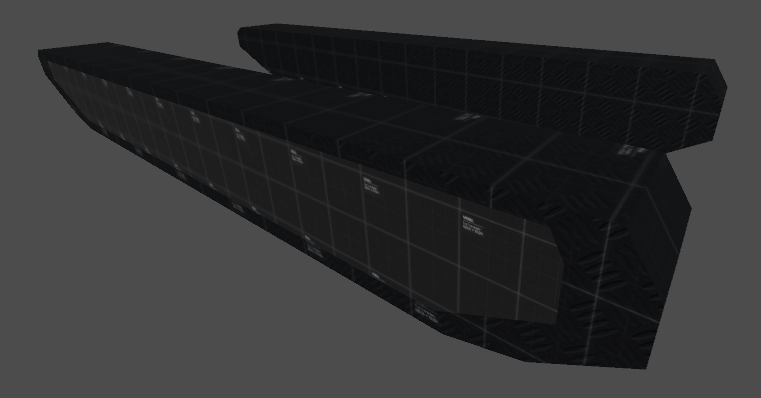
Dynamic Tracks
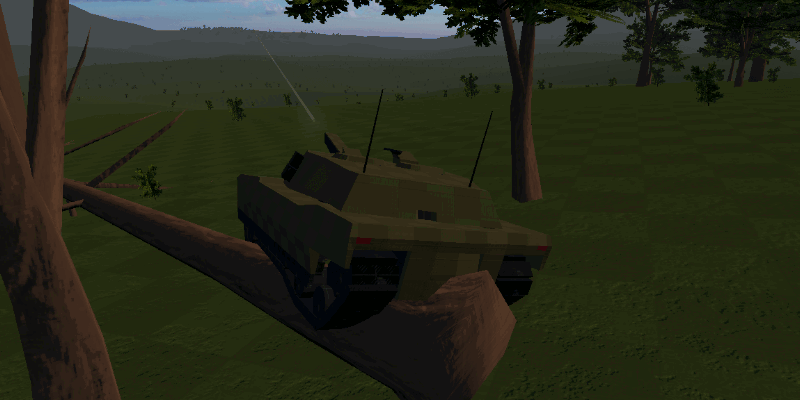
A system was also added that uses MultiMeshInstance3Ds for rendering and animating the track segments. When combined with the suspension ray-casts, these tracks can also conform to the shape of the terrain under the tank.
There is a Path3D that defines the shape of the track, and the MultiMeshInstance3D is used to place a series of track links along that path.
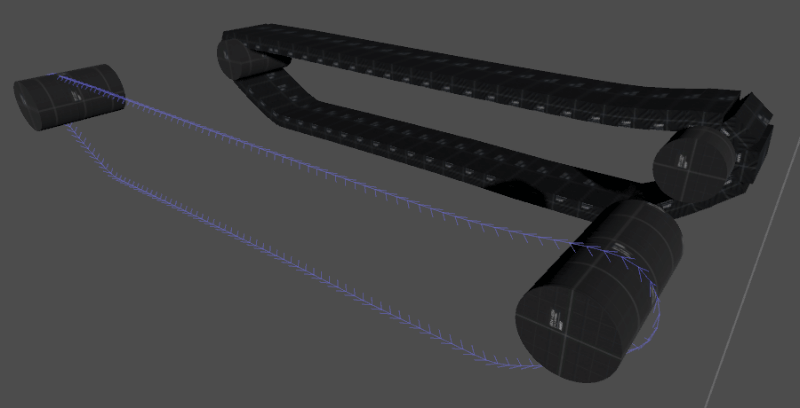
The bottom points of the Path3D are linked to suspension RayCast3Ds via a custom script on the track. Those points have their Y position value adjusted based on their corresponding ray's collision data.
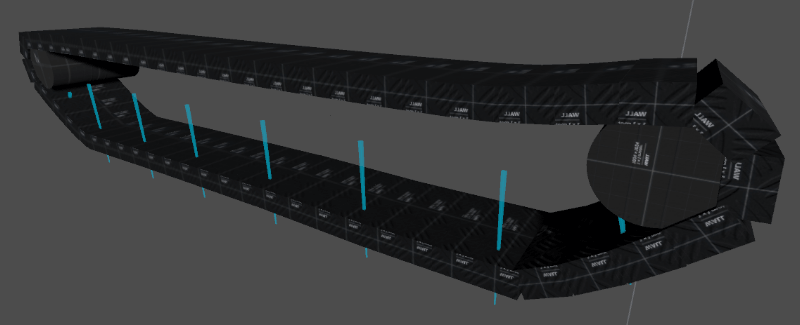
This adjusts the shape of the track's path dynamically, making the tracks follow the shape of the terrain.
This is vastly superior to the rough "sliding pontoon" method I was using earlier in this prototype. The tracks now conform to the shape of the terrain/items under the tank, the rocking of the body is now accurate and the result of the suspension instead of faked by code used to tilt the mesh.
This also does a better job of providing traction if just one track is touching something, because we aren't relying on rays placed in the center of the vehicle to detect the ground anymore.
This in-house implementation also, thankfully, does not have the sling problem I experienced with the VehicleWheel nodes.
Note:
This was posted to the Godot subreddit It's not perfect, but I finally got multimesh tank tracks and suspension working. It's so much better than just sliding around and I'm really happy with the result so far.
RayCast3D Drive Element Code
This is the code for the RayCast3D suspension/drive elements:
extends RayCast3D
class_name DriveElement

@export var spring_force := 180.0
@export var spring_force_max := 300.0
@export var stiffness := 0.85
@export var dampening := 0.05
@export var traction_x := 0.25
@export var traction_z := 0.15
@export var slide_threshold := 1.0
@export var mass := 100
@export var parent: RigidBody3D
@export var deadzone := 0.1

var is_on_ground := false
var instant_velocity := Vector3.ZERO
var last_length := 0.0
var previous_distance := target_position.y
var previous_hit_position := Vector3.ZERO
var collision_point := Vector3.ZERO

func _physics_process(delta):
    if is_colliding():
        _handle_collision(delta)
    else:
        _handle_no_collision()

func disable():
    set_physics_process(false)
    enabled = false

func enable(reset = true):
    set_physics_process(true)
    enabled = true
    if reset:
        _handle_no_collision()

func _handle_collision(delta: float):
    is_on_ground = true
    collision_point = get_collision_point()
    var other = get_collider()
    var hit_distance = max(to_local(collision_point).length(), deadzone)
    last_length = hit_distance

    instant_velocity = (collision_point - previous_hit_position) / delta

    var f_spring = stiffness * (abs(target_position.y) - hit_distance)
    var f_damp = dampening * (previous_distance - hit_distance) / delta
    var suspension_force = clamp((f_spring + f_damp) * spring_force, 0, spring_force_max)
    var suspension_force_vector = get_collision_normal() * suspension_force

    var local_velocity = instant_velocity * global_transform.basis

    var x_accel = (-local_velocity.x * traction_x) / delta
    var z_accel = (-local_velocity.z * traction_z) / delta
    var x_force = global_transform.basis.x * x_accel * mass
    var z_force = global_transform.basis.z * z_accel * mass

    if instant_velocity.length_squared() * delta < slide_threshold:
        x_force.x -= suspension_force_vector.x
        z_force.z -= suspension_force_vector.z

    var force = suspension_force_vector + x_force + z_force
    parent.apply_force(
        force,
        collision_point - parent.global_transform.origin
    )

    if other is RigidBody3D:
        other.apply_force(-force, get_collision_point() - other.global_transform.origin)

    previous_distance = hit_distance
    previous_hit_position = collision_point

func _handle_no_collision():
    is_on_ground = false
    previous_hit_position = global_transform.origin + target_position
    previous_distance = abs(target_position.y)
    instant_velocity = Vector3.ZERO
    last_length = -target_position.y

func apply_brake(value: float):
    traction_z = max(0.0, value)

func apply_force(force: Vector3):
    if is_on_ground:
        parent.apply_force(force, collision_point - parent.global_transform.origin)
Level of Detail
This may be a premature optimization, but I wanted to handle it while the workings of the ray-cast suspension were still fresh in mind.
To save on processing effort, for vehicles that are far away from the player we can progressively reduce fidelity (and cost) of the driving.
Nearby
As mentioned above, the player's vehicle has 16 ray-cast suspension elements, which provide a close approximation to the behavior of real tracks.
For NPC vehicles it's possible to use fewer rays since the player is not experiencing the handling directly. In the case of this game, for NPC vehicles within the player's vicinity only 10-12 rays are used.
The suspension forces of the fewer rays on the NPC vehicles are increased so that the vehicle is still supported with the same upward forces. The upward force of the combined 16 rays on the player's vehicle is equal to the upward force of the combined 10-12 rays of the NPC's vehicle.
A Little Farther Away
When an NPC vehicle gets even further away, we're able to use even fewer rays because the player is less and less likely to notice the difference. Again, the forces are adjusted so that the suspension force remains consistent to the full-fidelity version.
In addition, once the vehicle's are far enough away that it's no longer possible to see the movement of the track links, we can replace the tracks with a solid mesh that just simulates the shape of the tracks. This means that the game no longer has to compute the positions of the MultiMeshInstance3D's instances.

Even Further Away
As NPC vehicles get into the long-distance range, where they are difficult to observe even at high zoom levels, it is possible to reduce the fidelity further. The number of rays can be reduced to 4-8 at this point.
In addition, the track mesh can be simplified further to a single convex shape.
Maximum Distance
At extreme distances, when the terrain is also reduced to simplified shapes, the vehicles are reduced to have no more than 4 rays. In theory they could be reduced to 1 or 2 if some additional code was added to keep the vehicles correctly upright, or they could be returned to a sliding rigid body technique.
The fidelity of the overall tank and track meshes are greatly reduced.

Broken vehicles
Destroyed vehicles don't do any ray-casting. They just behave as rigid bodies.
Menus and Scene Switching
Prior to this update, booting the game took you directly into one of the test maps. Configured in code depending on which map was being used.
With this change, a basic title screen was added that allows the user to select between the multiple test maps, on the fly.

New Indicators
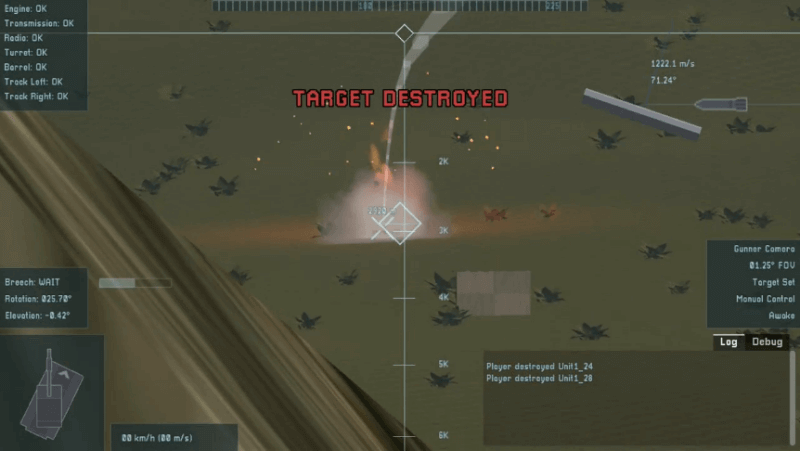
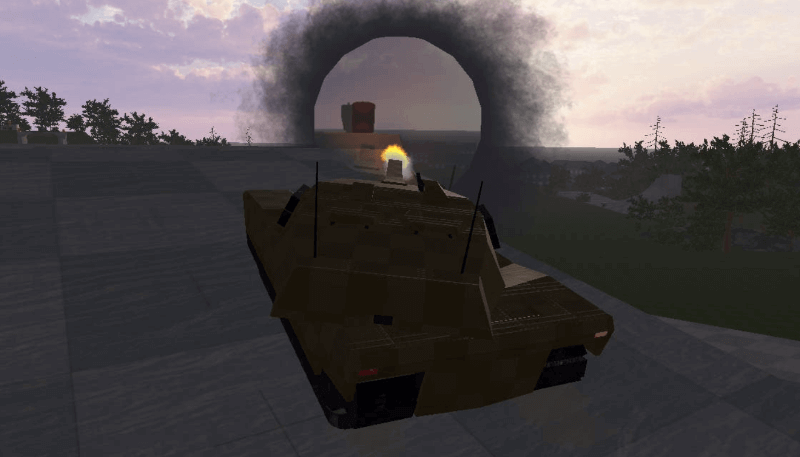
Also, a "reloading progress" and a "projectile-impact-angle visualization" were added.
The reload indicator is in the bottom left (above the orientation indicator) and shows the status with a simple progress bar. While the player's turret is reloading it emits an progress signal which is connected to the HUD.
The projectile-impact-angle visualization appears on the center-right of the HUD when the player's projectile hits something. The difference between the angle of the projectile and angle of the impacted surface's normal vector are supplied to the visualization, which then animates a shell hitting a surface with that angle between them.

In the future I'd like to extend this to be an armor penetration indicator. But that first requires work implementing armor and distinct hit-boxes, which is future work.
Pause Menu
One more UI addition, this adds a pause menu that allows switching between the current level and the title screen, or exiting the game quickly.

Note:
This was posted to the Godot subreddit Got around to adding camera shake, weapon kickback, a reload indicator, an impact-angle animation, basic title and pause menus, and a bunch of optimizations. Also a bigger muzzle flash, naturally.
Vapor Trails and Bullet Cams
While playing the game, I began to notice that it was difficult to see projectiles coming towards the player, and even to follow the player's projectile once it got really far away. One solution to this is to add a trail to the projectile's path. This allows the player to see where a shot came from, and creates an easy-to-follow line showing where the player's own shots are going.
There may be (probably is) a better way to achieve the vapor trail effect, but to accomplish it here I'm leaning on GPUParticles3D nodes to emit a long rectangular "trail" shape at a rapid pace. It's not perfect, and when I discover a better technique I'll try that, but it works well enough to give me an idea of how the game-play will feel when you can see where shots came from.
Bullet-View
In addition to the trails, a bullet-view camera was added to the front of the player's projectiles, and a picture-in-picture HUD element was added at the top-right. When the player fires a shot, a Camera3D associated with the projectile-view is attached to the projectile, and rendered into the sub viewport.

More HUD Changes
As the keen-eyed readers may have noticed in the previous two pictures, a compass element was added to the top of the HUD. The compass shows which direction the current camera is facing, and wraps around neatly when passing from 0 to 360 or vice-versa.
Note:
This was posted to the Godot subreddit This week in Godot tanks: bullet-view camera, prototype projectile vapor trails, some new sounds and hud styles, and a compass.
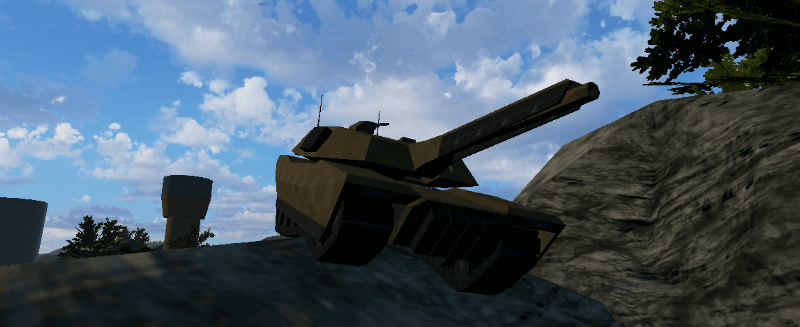
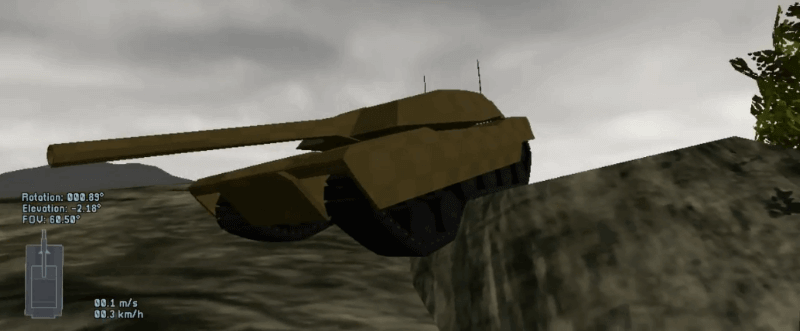
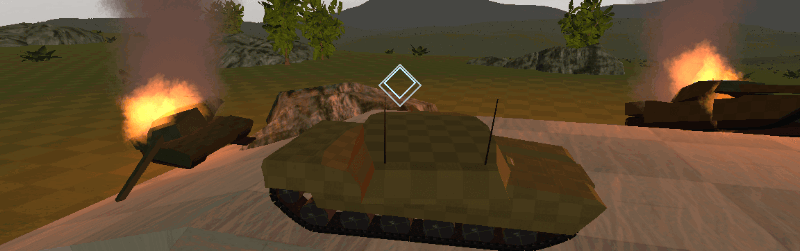
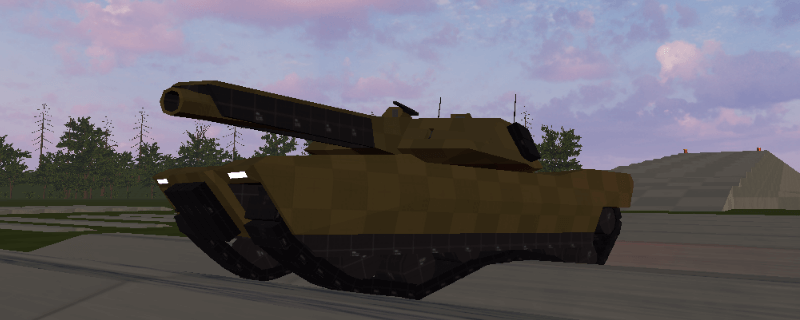
Improved tank model
Some time was invested in improving the demo tank model as well.
It still uses temporary test textures, but had its shape refined to look a bit less like real-world examples of tanks, and to look a bit more unique.

A covering was placed over the sides and top of the barrel, which I am pretending is part of some thermal signature obfuscation. A camera and sub-turret were added on top of the main turret, as well as a gunner-view on the front of the main turret.
Some spare track links were added to the sides of the turret and front of the main body, which could also act as extra armor. And small general tweaks were made all over the vehicle.
Improved Trees
The trees were upgraded to have better looking leaves, better bark textures, and to take advantage of visibility ranges to reduce their quality cleanly in the distance.
Even more exciting is that trees can now also be knocked over by the vehicles. The trees were converted from StaticBody3D nodes that were immovable, to RigidBody3D nodes that can be moved. To make things easier on the engine and the user's computer, the tree bodies are frozen when all vehicles are far away, this removes them from the pool of "active objects". It is only when a vehicle comes nearby that they are unfrozen and able to be moved.
They were given heavy angular and linear dampening values which makes them feel as though their roots are resisting the toppling. They also spawn an AudioPlayer3D node when unfrozen that plays a creaking sound if/when being moved.
Prototype Demo - Version 1
The prototype is available (for free) on Itch.io as Terminal Ballistics.

In this early state, there aren't a lot of in-game objectives. There is nothing yet in the way of plot, bosses, campaigns, or anything that fleshes this out as a real game. It's strictly a prototype and simulator at the moment.
The two things you can do are to test the vehicle and shoot at things.
Objective 1: Testing the vehicle handling

Objective 2: Shooting barrels and things
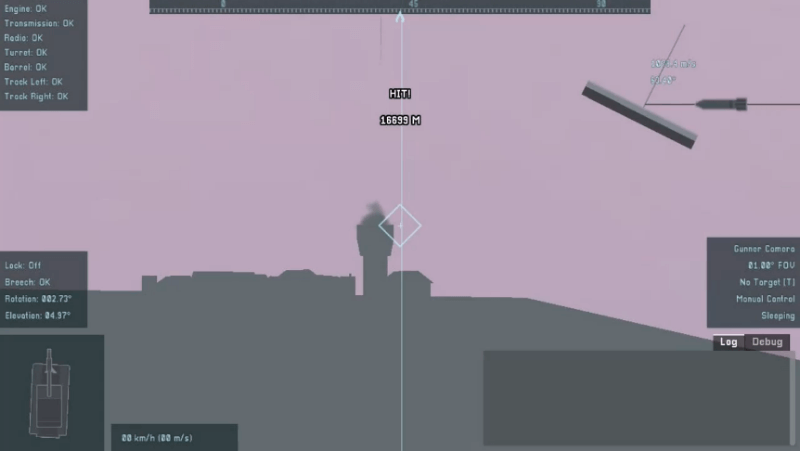
On the ballistics test map, my distance record for a successful hit was a 16,699 meter shot, hitting a practice barrel on top of a tower.
Note:
This was posted to the Godot subreddit You can now play the prototype version of my Godot tank game: Terminal Ballistics.
Demo
Terminal Ballistics is available for free on Itch.io:
Continue Reading
Work on this project continues in the next post: